MISC
- Keep block & file pools separate.
- Array layout (From back view):
- DAE
- DAE
- CS1
- CS0
- DM3-DM2
- SPB-SPA
- FAST cache at front of DAE (leave room for potential addition.
- Don't use RAID 1 across DAEs (w/ vault drives).
- Order of operation when powering up a new array:
- Verify cabling
- Power up DAEs; verify all lights indicate power and successful connection
- Power up SPE/DPE; verify DAEs show the currect bus and enclosure number (0-0 for DPE, 1-0 for first DAE, 0-1 for second DAE, and 1-1 for third DAE).
- Power up the DME
- Power up CS 0---wait some time and then power up CS 1 (We wan't CS 0 to become the primary!)
- Useful CLI commands to
- "Steal" from another existing array:
- ./nas_connecthome -i (Dial home information)
- ./nas_cs -i (IP info)
- ./nas_emailusers -i (Alert email information)
- /nas/sbin/getreason (hardware status of data movers)
- server_standby server_2 -activate mover (fails over DM)
- nas/sbin/check_inflight_tasks (view tasks the DMs are running)
- /nas/sbin/t2reset pwron -s 2 (reboot data mover that is shutdown)
- Give boot LUNs a LUN ID of 0.
- Create a classic RAID group for the VAULT drives---set the size to "MAX" and give the description of "DO NOT USE -- VAULT DRIVES." This will ensure no one accidentally tries to use these drives.
- RAID 5 (4+1), RAID 6 (6+2)
- When creating LUNs, try to start at 16 (leaving 0-15 free for host LUN IDs)--0-5 used for the OS.
- FCNS DB=entire fabric, FLOGI DB=device specific.
- Use classic RAID groups for the SavVol.
- LUNs presented to file systemse cannot be extended!
- How to connect the SP ports to the different fabrics: The objective is make sure A0 and B0 of the same array do not exist in the same fabric. These ports are used for mirrorview! With this setup, we'd setup our zoning as follows....
- FAB 1:
- A0
- B1
- A2
- B3
- ZONE 1:
- A0
- B1
- ZONE 2:
- A2
- B3
- FAB 2:
- B0
- A1
- B2
- A3
- ZONE 1:
- B0
- A1
- ZONE 2:
- B2
- A3

- Multipathing notes:
- Active/Passive: The VNX array is traditionally active/passive; one set of active paths to the LUN through the owning SP. Should the path to the owning SP fail, the LUN is trespassed and the host has to adjust to the new path (delay).
- Active/Active (WITH ALUA): Similar to active/passive in that an owning SP processes I/O, but with the difference being that the host can see both paths simultaneously. If the path through the owning SP fails, the host can initiate the trespass of the LUN to the other SP and continue on. Because I/Os can be redirected to SP owning the LUN through the CMI channel without needing a trespass, this causes a MUCH lower delay than the active/passive model.
- Active/Active (Symmetrical): Time for this to get interesting. Currently supported for classic LUNs only. A LUN can be seen and accessed through either SP equally. If a path fails, there is 0 delay in I/O to the LUN.
- Documentation notes....
- elabadvisor.com and upload both the "show tech details" scripts. Next, select SAN summary and export the SAN summary .csv file.
- We can use USM to get the information we need for the array side. SP collects-Support files=Block (.csv) and html for file.
- diag collect for file "telemity"
- iSCSI notes...
- Use a NIC that is rated for or exceeds the bandwidth of the network.
- Ensure legacy devices are not connected to 1 Gb/s or higher networks.
- Use redundant NICs for availability.
- Use the most up to date firmware and drivers.
- Use jumbo frames to increase bandwidth.
- For iSCSI, there is no zoning (unlike an FC SAN) so separate subnets are used to provide redundant paths to the iSCSI ports on the array. For iSCSI you should have mini-SANs (VLANs) with only one HBA per host in each VLAN with one port per storage processor (SP) (for example, A0 and B0 in one VLAN, A1 and B1 in another). All connections from a single server to a single storage system must use the same interface type, either NIC or HBA, but not both.
- It is good practice to create a separate, isolated IP network/VLAN for the iSCSI subnet. This is because the iSCSI data is unencrypted and also having an iSCSI-only network makes troubleshooting easier.
- If the host has only a single NIC/HBA, then it should connect to only one port per SP. If there are more NICs or HBAs in the host, then each NIC/HBA can connect to one port from SP A and one port from SP B. Connecting more SP ports to a single NIC can lead to discarded frames due to the NIC being overloaded.
- It is also best practice to use a different IP switch for the second iSCSI port on each SP. This is to prevent the IP switch being a single point of failure. In this way, were one IP switch to completely fail, the host can failover (via PowerPath) to the paths on the other IP switch. In the same way, it would be advisable to use different switches for multiple IP connections in the host.
- Gateways can be used, but the ideal configuration is for HBA to be on the same subnet as one SP A port and one SP B port, without using the gateway.
- Implementation:
- For each Fabric, create a separate dvSwitch that has 2 port groups: iSCSI1 and iSCSI2. Ensure that each port group has 1 active uplink. In this example, we’d configure 2 IP addresses for this host, with 1 for each fabric subnet. Fabric 1, for example, could use 10.0.1.2/24 for the host interface and 10.0.1.3/24 and 10.0.1.4/24 for the SP ports on the array. Fabric 2 could use 10.0.2.2/24 host interface and 10.0.2.3/24 and 10.0.2.4/24 for the SP ports on the array.
- In the above example we used a separate switch per fabric. The segmentation can be accomplished by using separate fabric switches or using VLANs to segment the traffic.
- If we wish to have MORE than 2 ports on the ESXi host....EMC recommends using more fabrics and separate VMkernal ports in different subnets on the host.
- VMkernal port group assignment:
- Explicit assignment (port binding): MUST use the same subnet address for all VMkernal port groups.
- NOT supported on VNX.
- Implicit assignment (RECOMMENDED FOR VNX)
- No VMkernal port groups are bound to the software initiator!
- VMkernal port group is shared with other VMkernal services.
- DISABLE DelayedACK on the dynamic discovery targets for 10Gb connections..or in general.
- VERIFICATION!
- Log into any of the ESXi hosts and perform a "esxtop." This did NOT work using secureCRT. When using putty, you get a bunch of good diagnostic data. Press "U" to view the device list.
- Per VMware, the tab "DAVG" should be <20. We verified that the LUNs we just presented to the host have a good DAVG value.

Local Protection Suite
SnapView
- Block-based, PIT replications.
- Ability to create snapshots (~20% size of original disk space--yay for pointers!) and clones (100% of original disk space).
- Snapshots
- 8 maximum snapshots per source.
- Technology used in Mirroview/A.
- Utilizes COFW technology
- Copies original data to a dedicated place called the "Reserved LUN pool" or RLP.
- RLP should be either a traditional RAID group or a THICK LUN!!
- Rule of thumb size for reserved LUNs are 20% of the source LUN size.
- Avoid create on drives serving source LUNs.
- Avoid create on system drives (first 5 drives for CX series and first 4 drives on VNX series).
- Avoid create reserve LUNs on SATA/NL-SAS drives if the source LUNs are SSD.
- Should not create more than 25 reserved LUNs per RAID Group and for each underlying RAID group in the pool.
- Distribute reserved LUNs across multiple RAID Groups.
- Create reserved LUNs with appropriate RAID type, RAID5 is always a good choice.
- 64 KB "chunks."
- Consistency exists by ctrl+clicking on the individual source LUNs. The consistency group technology is implemented in VNX Snapshots.
- Clones
- Uses clone private LUNs (CPLs) to track changes against the source and clone LUNs while fractured.
- 2 LUNs of at least 1 GB.
- Used to reduce time required to sync or reverse sync.
- Unavailable until sync process is completed.

VNX Snapshots
- Block-based, PIT replications.
- 256 maximum snapshots per source.
- Utilizes "Redirect on first Write" or ROW.
- Optimized for pool environment.
- New data saved in new area--no need to copy original data to a reserved location.
- Requires snapshot mount-points---this provides the ability for hosts to read and write to the change snapshot without having to rescan the SCSI bus on the client.
- Supports snapshots of snapshots (if not attached to a snapshot mount point!)
- Supports consistency groups!!! Treats multiple source LUNs as a single entity for making snapshots.

SnapSure
- File-based, PIT replication.
- Avoid snapshot schedules 1-5 mins past the hour (may conflict with other scheduled activities).
- 96 read-only snapshots and 16 writable snapshots.
- Maintains pointers to track changes to the primary file system using a SavVol.
- Create a SavVol raid group.
- Use RAID 1/0. When adding the disks to the RAID group, add them in the order indicated below. By doing so, we are able to balance the RAID 10 setup across the different DAEs. By selecting the disks in this order, A will be the primary to B and C will be the primary to D.

- Disable FAST Cache.
- Balance LUN SP ownership manually.
- Once you add the LUNs to the ~filestorage storage group, it will auto-create a storage pool for file. We want to create create a new storage pool for file and call it "SavVol Pool." We'll remove the LUNs from the automatically created pool and add them to our user-defined pool as a metavolume. In the future, when we need to use SnapSure or VNX replicator, we can statically configure the SavVol Pool as the location to store our snapshots.

RecoveryPoint/SE
- Features
- Journal Volumes: Snapshots of data to be replicated.
- Replica Volumes: Production storage volumes used in replication process.
- Must be as large or larger than the source volumes.
- Repository: Holds RecoveryPoint configuration metadata.
- Supports Consistency Groups!!!!
- Once the write request is sent to the array, it is forwarded to the RPA. Once the RPA receives the write request, it will send an ACK back to the splitter (array). The splitter will then writes the data to the production storage volume. Finally, the storage system sends an ACK back to the splitter upon successful writing of data to storage...who sends the final ACK to the host.
- Supports Async, Sync, and Async snap-based.

Remote Protection Suite
MirrorViewA/S
- Block only replication.
- Supports consistency groups--yay!
- FC or iSCSI replication.
- Secondary LUN must be the same size as the primary LUN (RAID configurations do not matter).
- 4:1 fan-in (A or S) or 2:1 fan-out (S) 1:1 fan-out (A)---Secondary LUNs must reside on separate arrays.
- Path must be SPA->SPA (Primary->Secondary array) and SPB-SPB (Primary->Secondary array).
- Mirror availability states:
- Inactive: Administrator has intentionally stopped mirroring.
- Active: Normal--yay!
- Attention: Something bad has happened....requires admin intervention.
- Mirror data states:
- Out-of-sync: Full sync is required.
- In-sync: Both sides have identical data.
- Synchronizing: Both sides have almost identical data...working on it!
- Rates are user configured.
- Secondary image is only usable after sync is complete.
- Initial sync is required for new mirrors.
- Rolling-back: Rolling back the primary to a predefined PIT.
- Consistent: Mirroring has been stopped--fracture/write intent required to continue mirror.
- Common operations:
- Promote: Secondary array is made the primary. The secondary must be in a consistent state or synchronized state.
- Fracture: Unlike a system fracture--which is usually means a communication failure between the pri/sec arrays, an admin fracture are initiated by the user to suspend replication. Synchronization must be manually issued by the administrator to restart replication.
- Thin provisioning and replication:
- Thin->Thin: Consumed capacity is replicated.
- Thin->Thick: Host visible capacity is replicated.
- NOTE: ONLY Mirrorview/S does a capacity check on secondary array---Mirrorview/A will simply fail and an admin fracture will occur.
- Synchronous vs Asynchronous:
- Synchronous:
- RPO is zero.
- Server I/O impacted by time to replicate. Distance is a large determining factor; too far of distance and I/O will be further impacted.
- Items:
- Fracture log:
- Invoked when secondary image of a mirror is unreachable and fractured. Used to incrementally re-sync data when the secondary image becomes available.
- Resident in the SP that owns the primary image.
- Automatically invoked when the secondary image of a mirror is lost.
- Write intent log (WIL):
- Keeps track of changes that have not yet been made to the remote image of the mirror.
- Tracks writes to both the primary and secondary images.
- Changes stored in persistent memory of the storage system on which the primary LUN resides.
- 2 private LUNs of at least 128 MB each (one per SP)--Must be RAID group enabled LUNs.
- RAID 1/0.
- Use flash drives if possible!
- Avoid using the vault drives if possible!
- Disable FAST cache!
- Unlike the fracture log, the WIL is ALWAYS active.
- When in use, MirrorView makes an entry in the write intent log of its intent to update the primary and secondary images at a particular location, then proceeds with the attempted update. After both images respond that data has been written (governed by normal LUN access mechanisms, for example, written to write cache), MirrorView clears previous write intent log entries. For performance reasons, the write intent log is not cleared immediately following the acknowledgement from the primary and secondary images. It will be cleared while subsequent write intent log operations are performed.
- Asynchronous:
- Uses SnapView technology.
- Application write time is not depending on the latency of the link.
- "Gold copy" created on the secondary image (PIT replication).
- Updates tracked at 2 KB granularity.
- Update cycle transfers changed blocks at 2-64 KB granularity.
- Deployment notes:
- You must promote a secondary MirrorView image before it is accessible to a host. Before promoting a secondary image, I/O must be stopped to the primary image and wait until the two images are in a "synchronized" state. A "consistent" state does not imply that the secondary image is recoverable. There could still be outstanding I/O to the secondary.
- DO NOT PROMOTE UNTIL YOU ARE READY TO FLIP (FOR MIGRATION PURPOSES). A promote will cause replication to continue in the reverse direction.
- The MirrorView/A secondary image is usually in the Consistent state when the primary is active. The secondary image will go to the Synchronized state if I/O is stopped and a subsequent update is started and completed before the I/O resumes to the primary image. This normally happens during a controlled failover situation like data migration or during planned testing.However, in the event of a disaster you should promote a secondary in the Consistent state. Follow these steps to perform a normal promotion to failover to the secondary site and the failback to the primary site without requiring a full synchronization:
- Quiesce I/O to the primary image after unmounting the primary image.
- Perform an update so that the secondary becomes synchronized.
- Promote the secondary image.
- Resume I/O to the new primary image, which was the secondary image previously.
- If you shut down the primary array before promoting the secondary, then the promotion will have to be forced and a resync will be required. If you promote the secondary first, then shut down the primary array, then in effect you’ve swapped the personalities and the fracture log in the DR location will track changes while the production site is down.
VNX Replicator
- IP File-based asynchronous remote replication.
- Up to 4 possible destinations objects from a single source.
- Uses SnapSure technology (See SnapSure notes for SavVol creation)!
- Requires data mover interconnect for array to array remote replication.
- Uses internal checkpoints.


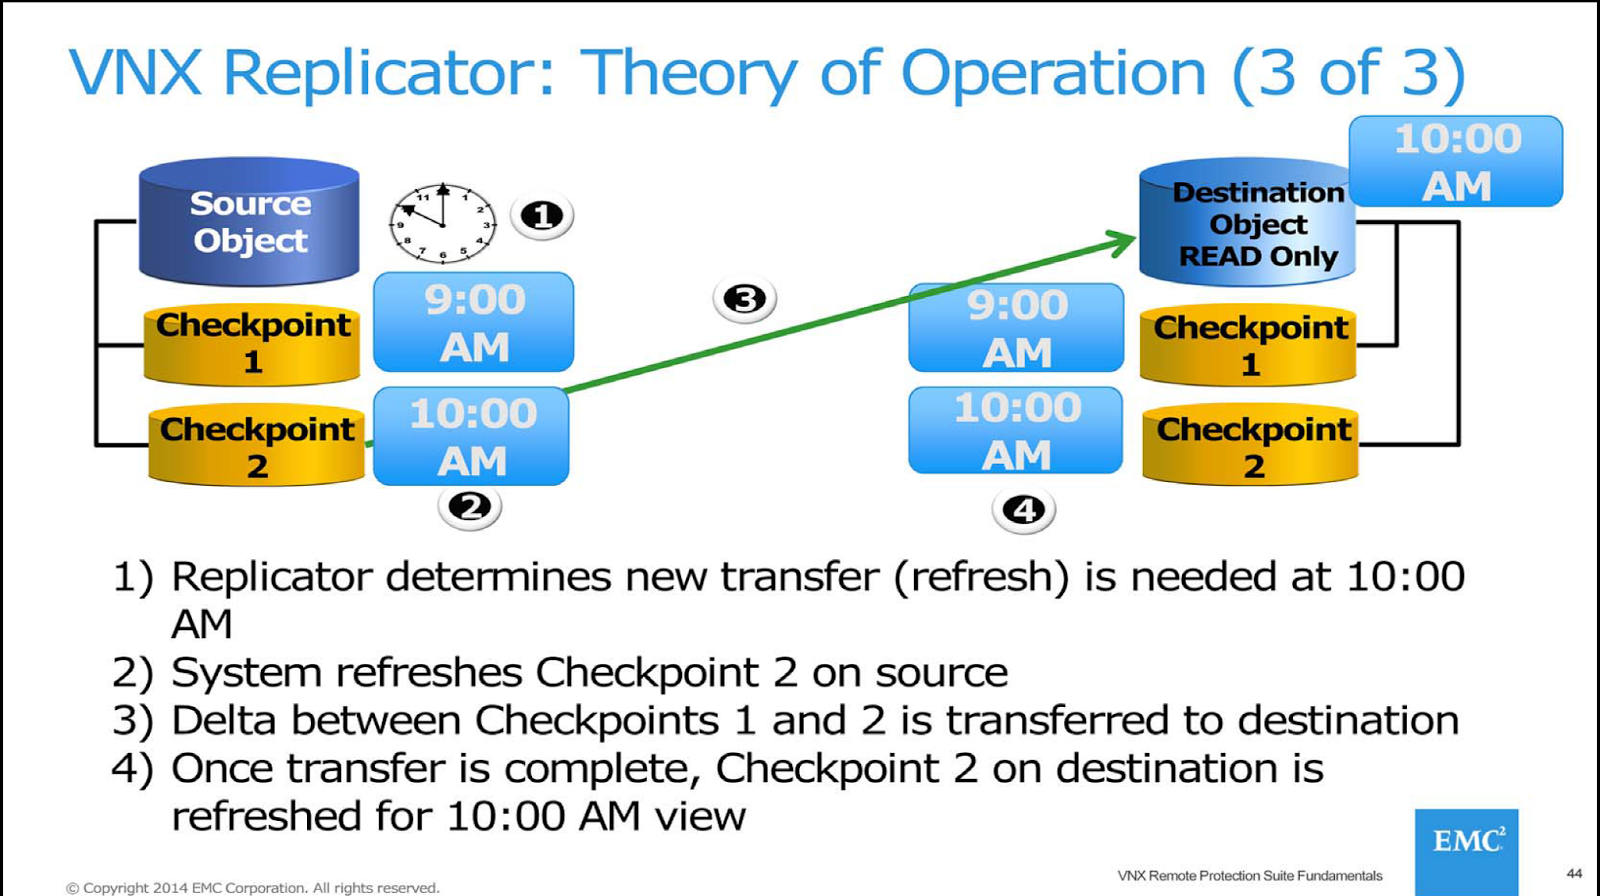
- Replication processes:
- Failover: Issued on destination VNX. Changes destination R/O objects to R/W--This may result in data loss, depending on when the last re-sync was performed.
- Reversal: Issued on the source VNX. Changes destination R/O objects to R/W--The difference is that synchronization now happens in the reverse direction.
- Switchover: Issued on the source VNX. The destination is synchronized with the source. Next, the replication is stopped and the source object is mounted as read only and the destination is mounted as read-write. Unlike a reversal, a switchover does not start the replication session.
- Deployment notes:
- Replicating a production file system:
- VNX replicator replicate VDM does NOT create any filesystems, etc.
- Once the VDM has been replicated, use the following command to "load" the VDM: "nas_server –vdm <VDMNAME> -setstate loaded"
- Once we load the VDM, we'll see that a CIFs server is created.
- We can then stop the previous replication job and create a NEW replication job to copy over the file systems. This will create the shares AND the file system on the new side.
- When creating the data mover interconnect...create a NEW interface (don't use the existing interfaces that we'll be using for file).
- INTERFACE NAMES MUST BE THE SAME IF USING REPLICATOR TO REPLICATE VDMs!!
- Don't forget to start the CIFS service!
- If we want to expand a file system....we need to..
- Create new RAID groups / Pool and add the new disks.
- Create new LUNs and present them to the filesystems storage group.
- Go to Store Pools for File Systems and do a "rescan."
- Once the scan is complete, you should see the storage pool size grow.
- Go to the file system you wish to grow and click extend. The available space should match the size of the newly added LUNs.
RecoveryPoint/SE Remote Replication
- Recovery Point Appliance (RPA): Uses standard TCP protocol for communication.
- Can support 1-8 RPAs in a cluster.
- Virtual RPA: VM running the Recovery Point software. Access the repository, journal, production, and and copy volumes with iSCSI.
- See RecoveryPoint/SE under local replication for more information.
File Notes
- File system architecture: dVol->stripe->slice->metavolume->filesystem
- dVol=LUNs allocated to the ~filesystem storage group.
- Stripe=Volumes striped together and presented as a single logical volume.
- AVM stripes 4 dVols when using RAID group LUNs.
- AVM stripes 5 dVols when using POOL LUNs.
- Before striping, AVM will divide available pool LUNs/dVols in thick and thin groups (Thick LUNs will be used before any Thin LUNs).
- If different sizes or pool+RAID group LUNs, it will concatenate the LUNs together.
- Slice=Satisfies file system request without utilizing entire stripe volume. "Method of making smaller volumes from larger volumes." For example, if we have an 80 GB stripe and want to create a 20 GB "Dept" file system, a slice would be created that carves 20 GB out of the available 80 GB stripe.
- Metavolume: Concatenation of one or more volumes. REQUIREMENT before a filesystem can be created. This allows the filesystem to be dynamically expanded by adding more volumes to the metavolume.
- Create a separate block pool dedicated for file! This will allow us to take the entire pool, present it to the ~filestorage file pool, and stripe the LUNs together (mapped pool).
- When pool LUNs are presented to the VNX file, a mapped pool is created by the AVM.
- Balance SP ownership when creating LUNs!
- Pool LUN count should be divisible by 5!
- If thin provisioning is desired, use thin enabled file systems on RAID group LUNs or thick LUNs, instead of thin LUNs.
- Dedup at file level...not block level!
- If a file system is extended, it will create a NEW metavolume (that has its own slice) and it will concatenate the NEW metavolume with the existing metavolume.
- If we rename a filesystem, we will need to rename the filesystem mountpoint and export! BLOW AWAY THE FILESYSTEM AND RECREATE IT!!!
- AVM steps:
- Create a "File Pool" storage pool.
- CIFS Notes:
- CIFS steps:
- Ensure NTP and DNS are configured for both DMs.
- Create a "device" under the "network settings for file. We would ideally have 2 devices: One on the primary DM and one on the secondary DM. The device will include the two links to the network switch aggregated together.
- Create interface and assign the VLAN associated with the CIFS server. This will be built on the physical DM and will use the device created.
- Verify the routes are in place to support access.
- Enable CIFS service (runs on physical DM).
- Create CIFS server (on VDM).
- Uses an available interfaces for network communication.
- Join CIFS server to Window's domain.
- Create CIFS share.
- You can only "steal" interfaces from CIFS servers on the same physical/VDM.
- BOTH physical DMs must have identical interface names, as the CIFS server is bound to the interface.
- server_umount manually unmount a VDM via CLI.
show tech details
USM - diagnostics, capture diag data -