Monday, July 27, 2015

VNX notes!

MISC

  • Keep block & file pools separate.
  • Array layout (From back view):
    • DAE
    • DAE
    • CS1
    • CS0
    • DM3-DM2
    • SPB-SPA
  • FAST cache at front of DAE (leave room for potential addition.
  • Don't use RAID 1 across DAEs (w/ vault drives).
  • Order of operation when powering up a new array:
    • Verify cabling 
    • Power up DAEs; verify all lights indicate power and successful connection
    • Power up SPE/DPE; verify DAEs show the currect bus and enclosure number (0-0 for DPE, 1-0 for first DAE, 0-1 for second DAE, and 1-1 for third DAE).
    • Power up the DME
    • Power up CS 0---wait some time and then power up CS 1 (We wan't CS 0 to become the primary!)
  • Useful CLI commands to 
    • "Steal" from another existing array:
      • ./nas_connecthome -i (Dial home information)
      • ./nas_cs -i (IP info)
      • ./nas_emailusers -i (Alert email information)
    • /nas/sbin/getreason (hardware status of data movers)
    • server_standby server_2 -activate mover (fails over DM)
    • nas/sbin/check_inflight_tasks (view tasks the DMs are running)
    • /nas/sbin/t2reset pwron -s 2 (reboot data mover that is shutdown)
  • Give boot LUNs a LUN ID of 0.
  • Create a classic RAID group for the VAULT drives---set the size to "MAX" and give the description of "DO NOT USE -- VAULT DRIVES."  This will ensure no one accidentally tries to use these drives.
  • RAID 5 (4+1), RAID 6 (6+2)
  • When creating LUNs, try to start at 16 (leaving 0-15 free for host LUN IDs)--0-5 used for the OS.
  • FCNS DB=entire fabric, FLOGI DB=device specific.
  • Use classic RAID groups for the SavVol.
  • LUNs presented to file systemse cannot be extended!
  • How to connect the SP ports to the different fabrics:  The objective is make sure A0 and B0 of the same array do not exist in the same fabric.  These ports are used for mirrorview!  With this setup, we'd setup our zoning as follows....
    • FAB 1:
      • A0
      • B1
      • A2
      • B3
        • ZONE 1:
          • A0
          • B1
        • ZONE 2:
          • A2
          • B3
    • FAB 2:
      • B0
      • A1
      • B2
      • A3
        • ZONE 1:
          • B0
          • A1
        • ZONE 2:
          • B2
          • A3

  • Multipathing notes:
    • Active/Passive: The VNX array is traditionally active/passive; one set of active paths to the LUN through the owning SP.  Should the path to the owning SP fail, the LUN is trespassed and the host has to adjust to the new path (delay).
    • Active/Active (WITH ALUA): Similar to active/passive in that an owning SP processes I/O, but with the difference being that the host can see both paths simultaneously.  If the path through the owning SP fails, the host can initiate the trespass of the LUN to the other SP and continue on.  Because I/Os can be redirected to SP owning the LUN through the CMI channel without needing a trespass, this causes a MUCH lower delay than the active/passive model.  
    • Active/Active (Symmetrical): Time for this to get interesting.  Currently supported for classic LUNs only.  A LUN can be seen and accessed through either SP equally.  If a path fails, there is 0 delay in I/O to the LUN.  
  • Documentation notes....
    • elabadvisor.com and upload both the "show tech details" scripts.  Next, select SAN summary and export the SAN summary .csv file.
    • We can use USM to get the information we need for the array side.  SP collects-Support files=Block (.csv) and html for file.  
    • diag collect for file "telemity"
  • iSCSI notes...
    • Use a NIC that is rated for or exceeds the bandwidth of the network.
    • Ensure legacy devices are not connected to 1 Gb/s or higher networks.
    • Use redundant NICs for availability.
    • Use the most up to date firmware and drivers.
    • Use jumbo frames to increase bandwidth.
    • For iSCSI, there is no zoning (unlike an FC SAN) so separate subnets are used to provide redundant paths to the iSCSI ports on the array. For iSCSI you should have mini-SANs (VLANs) with only one HBA per host in each VLAN with one port per storage processor (SP) (for example, A0 and  B0 in one VLAN, A1 and  B1 in another).  All connections from a single server to a single storage system must use the same interface type, either NIC or HBA, but not both. 
    • It is good practice to create a separate, isolated IP network/VLAN for the iSCSI subnet. This is because the iSCSI data is unencrypted and also having an iSCSI-only network makes troubleshooting easier. 
    • If the host has only a single NIC/HBA, then it should connect to only one port per SP.  If there are more NICs or HBAs in the host, then each NIC/HBA can connect to one port from SP A and one port from SP B.  Connecting more SP ports to a single NIC can lead to discarded frames due to the NIC being overloaded.  
    • It is also best practice to use a different IP switch for the second iSCSI port on each SP.  This is to prevent the IP switch being a single point of failure.  In this way, were one IP switch to completely fail, the host can failover (via PowerPath) to the paths on the other IP switch.  In the same way, it would be advisable to use different switches for multiple IP connections in the host.  
    • Gateways can be used, but the ideal configuration is for HBA to be on the same subnet as one SP A port and one SP B port, without using the gateway.
    • Implementation:
      • For each Fabric, create a separate dvSwitch that has 2 port groups: iSCSI1 and iSCSI2.  Ensure that each port group has 1 active uplink.  In this example, we’d configure 2 IP addresses for this host, with 1 for each fabric subnet.  Fabric 1, for example, could use 10.0.1.2/24 for the host interface and 10.0.1.3/24 and 10.0.1.4/24 for the SP ports on the array.  Fabric 2 could use 10.0.2.2/24 host interface and 10.0.2.3/24 and 10.0.2.4/24 for the SP ports on the array. 
      • In the above example we used a separate switch per fabric.  The segmentation can be accomplished by using separate fabric switches or using VLANs to segment the traffic.
      • If we wish to have MORE than 2 ports on the ESXi host....EMC recommends using more fabrics and separate VMkernal ports in different subnets on the host.
      • VMkernal port group assignment:
        • Explicit assignment (port binding): MUST use the same subnet address for all VMkernal port groups.  
          • NOT supported on VNX.
        • Implicit assignment (RECOMMENDED FOR VNX)
          • No VMkernal port groups are bound to the software initiator!
          • VMkernal port group is shared with other VMkernal services.
      • DISABLE DelayedACK on the dynamic discovery targets for 10Gb connections..or in general.
      • VERIFICATION!
        • Log into any of the ESXi hosts and perform a "esxtop."  This did NOT work using secureCRT.  When using putty, you get a bunch of good diagnostic data.  Press "U" to view the device list.
        • Per VMware, the tab "DAVG" should be <20.  We verified that the LUNs we just presented to the host have a good DAVG value.

Local Protection Suite

SnapView

  • Block-based, PIT replications.
  • Ability to create snapshots (~20% size of original disk space--yay for pointers!) and clones (100% of original disk space).
    • Snapshots
      • 8 maximum snapshots per source.
      • Technology used in Mirroview/A.
      • Utilizes COFW technology
        • Copies original data to a dedicated place called the "Reserved LUN pool" or RLP.  
        • RLP should be either a traditional RAID group or a THICK LUN!!
        • Rule of thumb size for reserved LUNs are 20% of the source LUN size.
        • Avoid create on drives serving source LUNs.
        • Avoid create on system drives (first 5 drives for CX series and first 4 drives on VNX series).
        • Avoid create reserve LUNs on SATA/NL-SAS drives if the source LUNs are SSD.
        • Should not create more than 25 reserved LUNs per RAID Group and for each underlying RAID group in the pool.
        • Distribute reserved LUNs across multiple RAID Groups.
        • Create reserved LUNs with appropriate RAID type, RAID5 is always a good choice.
      • 64 KB "chunks."
      • Consistency exists by ctrl+clicking on the individual source LUNs.  The consistency group technology is implemented in VNX Snapshots.
    • Clones
      • Uses clone private LUNs (CPLs) to track changes against the source and clone LUNs while fractured.  
        • 2 LUNs of at least 1 GB.   
        • Used to reduce time required to sync or reverse sync.  
      • Unavailable until sync process is completed.

VNX Snapshots

  • Block-based, PIT replications.
  • 256 maximum snapshots per source.
  • Utilizes "Redirect on first Write" or ROW.
    • Optimized for pool environment.
    • New data saved in new area--no need to copy original data to a reserved location.
  • Requires snapshot mount-points---this provides the ability for hosts to read and write to the change snapshot without having to rescan the SCSI bus on the client. 
  • Supports snapshots of snapshots (if not attached to a snapshot mount point!)
  • Supports consistency groups!!!  Treats multiple source LUNs as a single entity for making snapshots.  

SnapSure

  • File-based, PIT replication.
  • Avoid snapshot schedules 1-5 mins past the hour (may conflict with other scheduled activities).
  • 96 read-only snapshots and 16 writable snapshots.
  • Maintains pointers to track changes to the primary file system using a SavVol.
    • Create a SavVol raid group.
    • Use RAID 1/0.  When adding the disks to the RAID group, add them in the order indicated below.  By doing so, we are able to balance the RAID 10 setup across the different DAEs.  By selecting the disks in this order, A will be the primary to B and C will be the primary to D.   

    • Disable FAST Cache.
    • Balance LUN SP ownership manually.
    • Once you add the LUNs to the ~filestorage storage group, it will auto-create a storage pool for file.  We want to create create a new storage pool for file and call it "SavVol Pool."  We'll remove the LUNs from the automatically created pool and add them to our user-defined pool as a metavolume.  In the future, when we need to use SnapSure or VNX replicator, we can statically configure the SavVol Pool as the location to store our snapshots.


RecoveryPoint/SE


  • Features
    • Journal Volumes: Snapshots of data to be replicated.
    • Replica Volumes: Production storage volumes used in replication process.
      • Must be as large or larger than the source volumes. 
    • Repository: Holds RecoveryPoint configuration metadata.
  • Supports Consistency Groups!!!!
  • Once the write request is sent to the array, it is forwarded to the RPA.  Once the RPA receives the write request, it will send an ACK back to the splitter (array).  The splitter will then writes the data to the production storage volume.  Finally, the storage system sends an ACK back to the splitter upon successful writing of data to storage...who sends the final ACK to the host.
  • Supports Async, Sync, and Async snap-based.


Remote Protection Suite


MirrorViewA/S

  • Block only replication.
  • Supports consistency groups--yay!
  • FC or iSCSI replication.
  • Secondary LUN must be the same size as the primary LUN (RAID configurations do not matter).
  • 4:1 fan-in (A or S) or 2:1 fan-out (S) 1:1 fan-out (A)---Secondary LUNs must reside on separate arrays.
  • Path must be SPA->SPA (Primary->Secondary array) and SPB-SPB (Primary->Secondary array).
  • Mirror availability states:
    • Inactive: Administrator has intentionally stopped mirroring.
    • Active: Normal--yay!
    • Attention: Something bad has happened....requires admin intervention.
  • Mirror data states:
    • Out-of-sync: Full sync is required.
    • In-sync: Both sides have identical data.
    • Synchronizing: Both sides have almost identical data...working on it!
      • Rates are user configured.
      • Secondary image is only usable after sync is complete.
      • Initial sync is required for new mirrors.
    • Rolling-back: Rolling back the primary to a predefined PIT.
    • Consistent: Mirroring has been stopped--fracture/write intent required to continue mirror.
  • Common operations:
    • Promote: Secondary array is made the primary.  The secondary must be in a consistent state or synchronized state.  
    • Fracture: Unlike a system fracture--which is usually means a communication failure between the pri/sec arrays, an admin fracture are initiated by the user to suspend replication.  Synchronization must be manually issued by the administrator to restart replication.
  • Thin provisioning and replication:
    • Thin->Thin: Consumed capacity is replicated.
    • Thin->Thick: Host visible capacity is replicated.
    • NOTE: ONLY Mirrorview/S does a capacity check on secondary array---Mirrorview/A will simply fail and an admin fracture will occur.
  • Synchronous vs Asynchronous:
    • Synchronous:
      • RPO is zero.
      • Server I/O impacted by time to replicate.  Distance is a large determining factor; too far of distance and I/O will be further impacted.
      • Items:
        • Fracture log: 
          • Invoked when secondary image of a mirror is unreachable and fractured.  Used to incrementally re-sync data when the secondary image becomes available.
          • Resident in the SP that owns the primary image.
          • Automatically invoked when the secondary image of a mirror is lost.
        • Write intent log (WIL): 
          • Keeps track of changes that have not yet been made to the remote image of the mirror.
          • Tracks writes to both the primary and secondary images.
          • Changes stored in persistent memory of the storage system on which the primary LUN resides.  
          • 2 private LUNs of at least 128 MB each (one per SP)--Must be RAID group enabled LUNs.
            • RAID 1/0.
            • Use flash drives if possible!
            • Avoid using the vault drives if possible!
            • Disable FAST cache!
          • Unlike the fracture log, the WIL is ALWAYS active.
          • When in use, MirrorView makes an entry in the write intent log of its intent to update the primary and secondary images at a particular location, then proceeds with the attempted update. After both images respond that data has been written (governed by normal LUN access mechanisms, for example, written to write cache), MirrorView clears previous write intent log entries. For performance reasons, the write intent log is not cleared immediately following the acknowledgement from the primary and secondary images. It will be cleared while subsequent write intent log operations are performed.
    • Asynchronous:
      • Uses SnapView technology.
      • Application write time is not depending on the latency of the link.
      • "Gold copy" created on the secondary image (PIT replication).
      • Updates tracked at 2 KB granularity.
        • Update cycle transfers changed blocks at 2-64 KB granularity.
  • Deployment notes:
    • You must promote a secondary MirrorView image before it is accessible to a host. Before promoting a secondary image, I/O must be stopped to the primary image and wait until the two images are in a "synchronized" state.  A "consistent" state does not imply that the secondary image is recoverable. There could still be outstanding I/O to the secondary.
      • DO NOT PROMOTE UNTIL YOU ARE READY TO FLIP (FOR MIGRATION PURPOSES).  A promote will cause replication to continue in the reverse direction.
    • The MirrorView/A secondary image is usually in the Consistent state when the primary is active. The secondary image will go to the Synchronized state if I/O is stopped and a subsequent update is started and completed before the I/O resumes to the primary image. This normally happens during a controlled failover situation like data migration or during planned testing.However, in the event of a disaster you should promote a secondary in the Consistent state. Follow these steps to perform a normal promotion to failover to the secondary site and the failback to the primary site without requiring a full synchronization:
      1. Quiesce I/O to the primary image after unmounting the primary image.
      2. Perform an update so that the secondary becomes synchronized.
      3. Promote the secondary image.
      4. Resume I/O to the new primary image, which was the secondary image previously.
    • If you shut down the primary array before promoting the secondary, then the promotion will have to be forced and a resync will be required.  If you promote the secondary first, then shut down the primary array, then in effect you’ve swapped the personalities and the fracture log in the DR location will track changes while the production site is down.

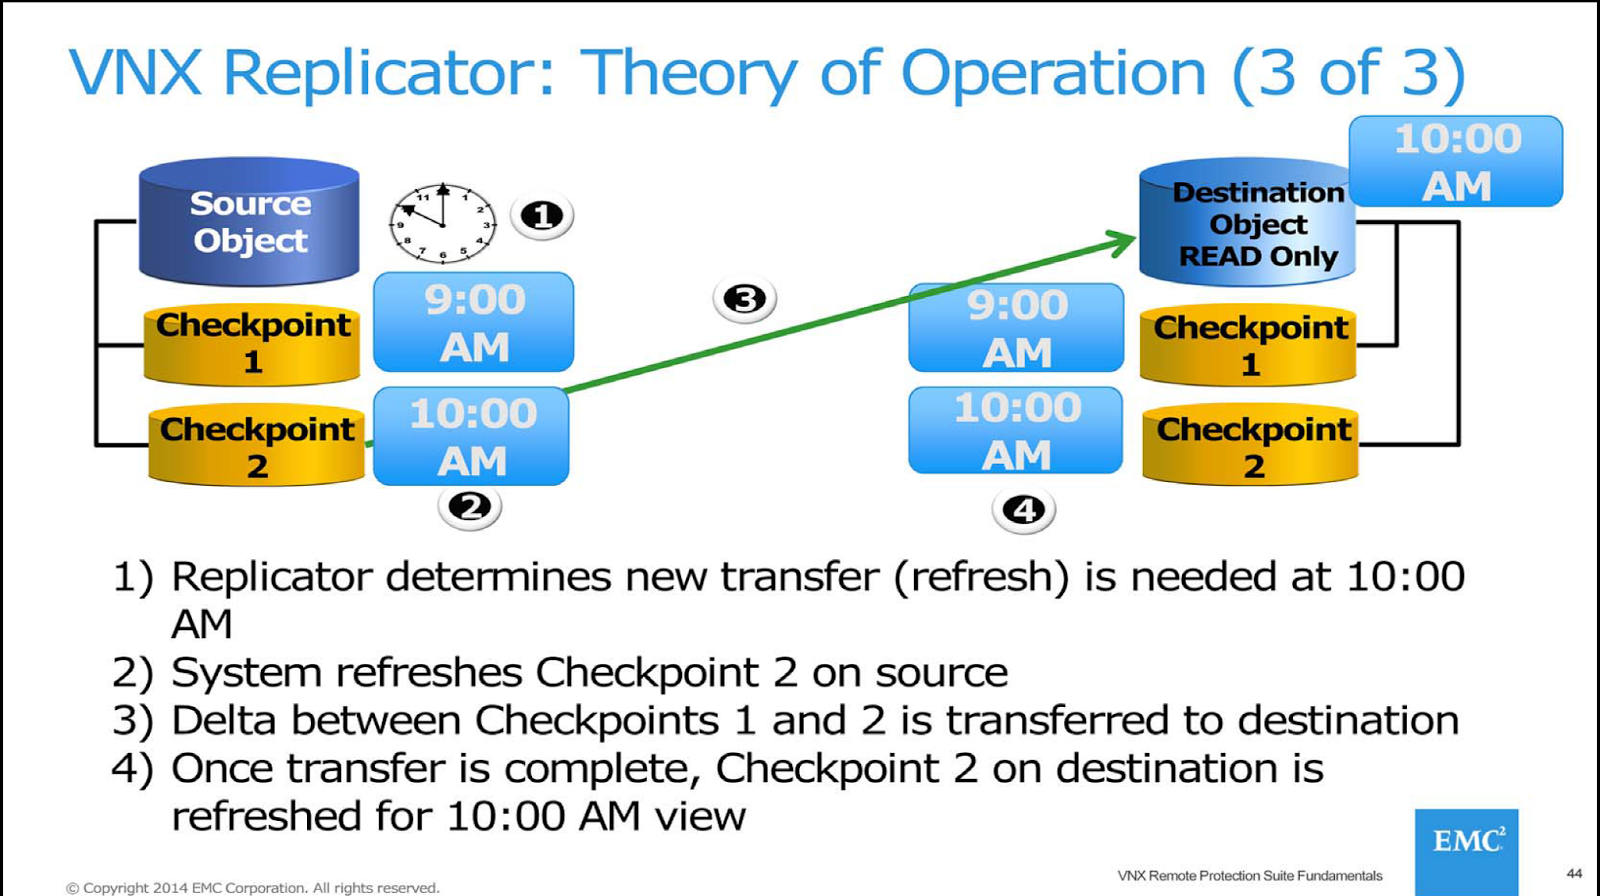
VNX Replicator


  • IP File-based asynchronous remote replication.
  • Up to 4 possible destinations objects from a single source.
  • Uses SnapSure technology (See SnapSure notes for SavVol creation)!
  • Requires data mover interconnect for array to array remote replication.
  • Uses internal checkpoints.


  • Replication processes:
    • Failover: Issued on destination VNX.  Changes destination R/O objects to R/W--This may result in data loss, depending on when the last re-sync was performed.  
    • Reversal: Issued on the source VNX.  Changes destination R/O objects to R/W--The difference is that synchronization now happens in the reverse direction.
    • Switchover: Issued on the source VNX.  The destination is synchronized with the source.  Next, the replication is stopped and the source object is mounted as read only and the destination is mounted as read-write.  Unlike a reversal, a switchover does not start the replication session.
  • Deployment notes:
    • Replicating a production file system:
      • VNX replicator replicate VDM does NOT create any filesystems, etc.
      • Once the VDM has been replicated, use the following command to "load" the VDM:  "nas_server –vdm <VDMNAME> -setstate loaded"
      • Once we load the VDM, we'll see that a CIFs server is created.
      • We can then stop the previous replication job and create a NEW replication job to copy over the file systems.  This will create the shares AND the file system on the new side.
    • When creating the data mover interconnect...create a NEW interface (don't use the existing interfaces that we'll be using for file).  
    • INTERFACE NAMES MUST BE THE SAME IF USING REPLICATOR TO REPLICATE VDMs!!
    • Don't forget to start the CIFS service!
    • If we want to expand a file system....we need to..
      1. Create new RAID groups / Pool and add the new disks.
      2. Create new LUNs and present them to the filesystems storage group.
      3. Go to Store Pools for File Systems and do a "rescan."
      4. Once the scan is complete, you should see the storage pool size grow.
      5. Go to the file system you wish to grow and click extend.  The available space should match the size of the newly added LUNs.

RecoveryPoint/SE Remote Replication

  • Recovery Point Appliance (RPA): Uses standard TCP protocol for communication.
    • Can support 1-8 RPAs in a cluster.
  • Virtual RPA: VM running the Recovery Point software.  Access the repository, journal, production, and and copy volumes with iSCSI.  
  • See RecoveryPoint/SE under local replication for more information.

File Notes

  • File system architecture: dVol->stripe->slice->metavolume->filesystem
    • dVol=LUNs allocated to the ~filesystem storage group.
    • Stripe=Volumes striped together and presented as a single logical volume.
      • AVM stripes 4 dVols when using RAID group LUNs.
      • AVM stripes 5 dVols when using POOL LUNs.
      • Before striping, AVM will divide available pool LUNs/dVols in thick and thin groups (Thick LUNs will be used before any Thin LUNs).  
      • If different sizes or pool+RAID group LUNs, it will concatenate the LUNs together.
    • Slice=Satisfies file system request without utilizing entire stripe volume.  "Method of making smaller volumes from larger volumes."  For example, if we have an 80 GB stripe and want to create a 20 GB "Dept" file system, a slice would be created that carves 20 GB out of the available 80 GB stripe.
    • Metavolume: Concatenation of one or more volumes.  REQUIREMENT before a filesystem can be created.  This allows the filesystem to be dynamically expanded by adding more volumes to the metavolume.
  • Create a separate block pool dedicated for file!  This will allow us to take the entire pool, present it to the ~filestorage file pool, and stripe the LUNs together (mapped pool).
  • When pool LUNs are presented to the VNX file, a mapped pool is created by the AVM.  
  • Balance SP ownership when creating LUNs!
  • Pool LUN count should be divisible by 5!
  • If thin provisioning is desired, use thin enabled file systems on RAID group LUNs or thick LUNs, instead of thin LUNs.
  • Dedup at file level...not block level!
  • If a file system is extended, it will create a NEW metavolume (that has its own slice) and it will concatenate the NEW metavolume with the existing metavolume.
  • If we rename a filesystem, we will need to rename the filesystem mountpoint and export!  BLOW AWAY THE FILESYSTEM AND RECREATE IT!!!
  • AVM steps:
    1. Create a "File Pool" storage pool.
  • CIFS Notes:
    • CIFS steps:
      1. Ensure NTP and DNS are configured for both DMs.
      2. Create a "device" under the "network settings for file.  We would ideally have 2 devices: One on the primary DM and one on the secondary DM.  The device will include the two links to the network switch aggregated together.
      3. Create interface and assign the VLAN associated with the CIFS server.  This will be built on the physical DM and will use the device created.
      4. Verify the routes are in place to support access.
      5. Enable CIFS service (runs on physical DM).
      6. Create CIFS server (on VDM).
        • Uses an available interfaces for network communication.
      7. Join CIFS server to Window's domain.
      8. Create CIFS share.
    • You can only "steal" interfaces from CIFS servers on the same physical/VDM.
    • BOTH physical DMs must have identical interface names, as the CIFS server is bound to the interface.
    • server_umount manually unmount a VDM via CLI.
show tech details
USM - diagnostics, capture diag data - 

Friday, May 29, 2015

ACS 5.6 install notes

Cisco Access Control Server (ACS) 5.6 install

I had a project to install ACS 5.6 for a customer..and I just wanted to go into a bit of detail of what I did for them!

ACS 5.6 can be installed on a VM or a physical chassis.  With regards to the physical chassis, there are a few options: Cisco's SNS 3415 chassis (who the customer used in this case) or the legacy Cisco 1113 chassis.  In the past, I'd always used the 1113 chassis or VMs--This was my first SNS 3415 install.

Before we dig into the ACS specifics, I'll discuss the setup of the device!

Racking:
The setup was fairly easy (with a bit of googling!)--as there were no instructions in the box.  The box comes with the physical chassis, a set of rails, mounting screws, power cables, ethernet cables, and a serial dongle.  The trick to mount the rails were to pull up on a tab on the end of the rail and pull back on the spring loaded mounts (1).  You then slide the square (or circular, depending on your rack) pegs into the rack (2).  Once they are in, pull on the same tab and the spring will close the gap and hold the bracket firmly against the rack (1).  Once you do the same for the backside of the rail (make sure they are on the same RU!!), there is a screw hole on the front of the rack to keep the rail from coming undone.  After you get the screws it, it is as simple as sliding the server onto the rails, as it already has the mounts on the server.  Once mounted, I ran ethernet to two different switches.  

The SNS 3415 supports bonding the physical ethernet ports so to provide upstream switch and cable redundancy.  When you bond the ports it creates a logical bond port.  One port is active while the secondary is passive; both ports will share the same MAC address so to avoid any bridging loops/mac address-table instability.  Just for verification sake, I took down one of the ports and at most saw a single packet lost.


Once you power on the device, it will immediately prompt you with the configuration items: hostname, IP address, gateway, name server, domain, CLI login, password, etc.  

Now!  Lets get to the meat of it all!

To start things off..lets get this baby integrated with AD!

This part is pretty darn easy.  Simply click on "join/test connection" from the "Active Directory" sub-section and enter the required information.  Remember, if you're using the name service, you must have configured the name-services in the CLI beforehand!  NOTE: When adding the ACS server to AD, The AD account required for domain access in ACS should have either of these privileges:

Add workstations to domain user right in corresponding domain.
Create Computer Objects or Delete Computer Objects permission on corresponding computers     container where ACS machine's account is created before joining ACS machine to the domain.


Integrating AD allows us to do two important things: Use our AD accounts for device management and ACS management.  For device management purposes, you can map certain AD user groups to certain rights/command sets.  Furthermore, you can map certain AD groups certain ACS rights (read/write/superadmin).

To select the AD groups you wish to use, click select under "Directory Groups."  If your device is joined and connected to AD, you should see a list of the groups available.  In this example I simply added a generic "Domain Admins."
Call me crazy, but I want both users in active directory and local users to be able to access the devices.  Who knows...maybe you have a vendor who you want to grant network access but don't want to create an AD account?  To do so, go to "Identity Store Sequences" and create a custom ID store.  Under the "Authentication and Attribute Retrieval Search List" choose both AD1 and Internal users.  In this order, it will first verify if the user is in AD, but if not, will check the local user store.

Implementation:

Time to create some Identity groups!  Identity groups are nothing more than a container in which you can associate certain rights/privileges.  In a basic ACS setup I'd create two identity groups: Read only users (users who can only run show commands) and Network admins (unlimited access).

Shell profiles!  Shell profiles are a place where you can assign attributes (default/maximum privilege, shell timeouts, etc).  Here I would create two shell profiles: Network Admins and Read Only.  The example below is pretty much the only values I'd put in for the Network Admins shell profile.  For the Read Only profile I'd set the default privilege to 1 and configure a timeout value of 10 minutes.   

Command sets!  Shell profiles are where you identify what commands can be run.  For example purposes, I'd create two shell profiles: Show only and Permit any.  Show only is limited to basic show commands while Permit any can run any command.  
By not listing any arguments, any parameter of the given commands are permitted.  For example, since the "show" command is allowed, it would also allow show run, show ip interface brief, etc.  If we were to have listed the argument "run" under arguments, then only the show run command would per permitted.

For the permit any, it is as simple as checking the "Permit any command that is not in the table below" checkbox.  Since we did not list any commands, all commands will be allowed!

Now that we have the identity groups, shell profiles, and command sets created, now we have to configure the device management.  Under the access policies section you will see access services.  Unless its a large scale deployment..I'm fairly comfortable using the default device admin service.  Under "Default Device Admin" you will see three fields: Identity, Group Mapping, and Authorization.  If you do not see one of these, click on "Default Device Admin"--there should be checkboxes for each area.  

Identity: This area is fairly simple.  When a username is entered, it needs to know where to lookup the username for access.  I've been successful leaving it in "Single result selection" and using the custom identity store we created at the start.  

Group Mapping: Here is where we map the AD group to a particular identity group.
If you do not see any of the fields above, click on "customize" in the bottom right hand corner.  For this particular customer, they weren't interested in the "Read only" user group...but it would be the same process tying the read only AD group to the predefined read only identity group.

Authorization: Here is where we put a bow on everything---we tie the identity group to the pre-defined shell profile and command sets!

While the read only users is not being used, I still created the authorization rule in the event they change their minds.  Furthermore, the customize bottom button at the bottom right corner can give you a TON of conditions (should you want to use them).  You can setup authorization rules based on device type, location, time, IP address, etc.

In addition to the AD mappings, we were also able to use the local users.  The key for this is to specify what identity group the user is in under the user settings.  In the example below, kyle.barnes would be part of the shell profile "Network Admins" and the command set "Permit any."

Adding network devices:

This part is super easy if you aren't being picky in your authorization rules.  In this customer's case, they didn't care about having location/device type specific rules, so I didn't have to be too granular in the device addition.  
I created 3 device types (Router, switch, and firewall) under network resources.  Was this necessary, given their requirements?  No.  I included the device type for logging purposes.  If one only cares for the bare bones, then he or she would only need to include the name, IP address, and TACACS shared secret!

AAA configurations:

Here is where things can get tricky.  Lets start easy...tacacs-server configs!

ip tacacs source-interface <management interface>
tacacs-server host <ACS IP address>
tacacs-server key 0 <shared secret configured in the network resources>

Now the fun part..

One thing I may add is more accounting on the commands.  I feel as if I can sometimes get more information than via the authorization logs.

Time for device administration!

As I said previously, we can now manage the ACS server with our AD credentials!  To do so, you need to configure the Administrative access control section as follows:
This rule basically says, "If you are trying to connect with a username, let me try and compare it against my AD ID store."


Lastly, the Authorization Policy says "Ok, let me see what group that particular user is in.  Once I find it, you will have the resulting role."  In the picture above, if your AD account is in the group "Domain Admins" then you'll have SuperAdmin rights.

Important notes!

  • Default ACS web login: U: acsadmin P: default -- by default acsadmin is the recovery account.  Regardless of how anything is setup it will let you in!  


Thursday, May 28, 2015

Auto-negotiation

I figured i'd put together some notes to concisely describe auto-negotiation, based off a particular client's requirements.

What is auto-negotiation?  It is an Ethernet procedure by which two connected devices choose common transmission parameters, such as speed, duplex mode, and flow control.  Basically, it is a mechanism for two devices to negotiate the BEST method of communicating across a common link.  The most common parameters negotiated are speed and duplex.

But why is this needed?  Well, in a word where end devices support half-duplex, full-duplex, 10 Mbps, 100 Mbps, 1 Gbps, etc...it would be a monumental task to maintain static duplex/speed configurations on a large enterprise network.  In addition to duplex and speed, auto-negotiation can also be used to detect physical layer issues.  

I like to compare half-duplex and full-duplex to a walkie-talkie and a telephone, respectively.  In half-duplex, only one end of the communication can send or receive at any given period of time.  With full-duplex, both nodes can send and receive simultaneously.  In an ideal scenario, full-duplex is the preferred means of communication..obviously.

Regardless of what is "best," both ends of the link go through the following list to determine the best possible mode of operation that is supported by both devices:


  1. 10GBASE-T full duplex
  2. 1000BASE-T full duplex
  3. 1000BASE-T half duplex
  4. 100BASE-T2 full duplex
  5. 100BASE-TX full duplex
  6. 100BASE-T2 half duplex
  7. 100BASE-T4 half duplex
  8. 100BASE-TX half duplex
  9. 10BASE-T full duplex
  10. 10BASE-T half duplex


In other words, among the modes that are supported by both devices, each device chooses the one that is the topmost in this list.

The real complications arise when either a switch port or a end device is hard-coded.  Why might something get hardcoded?  Well, there used to be a time when the auto-negotiation standards were interpreted wildly by every given vendor.  As a result of previous inconsistencies, many people today still fear auto-magically letting things negotiate.  The problem with hard-coding, is that there are often cases where doing so will "break" the link:


1 A duplex mismatch can result in performance issues, intermittent connectivity, and loss of communication. When you troubleshoot NIC issues, verify that the NIC and switch use a valid configuration.

2 Some third-party NIC cards can fall back to half-duplex operation mode, even though both the switch port and NIC configuration are manually configured for 100 Mbps, full-duplex. This is because NIC autonegotiation link detection still operates when the NIC is manually configured. This causes duplex inconsistency between the switch port and the NIC. Symptoms include poor port performance and frame check sequence (FCS) errors that increment on the switch port. In order to troubleshoot this issue, try to manually configure the switch port to 100 Mbps and half-duplex. If this action resolves the connectivity problems, this NIC issue is the possible cause. Try to update to the latest drivers for your NIC, or contact your NIC card vendor for additional support.

Wednesday, May 27, 2015

Random QoS Notes

My brain hurts


Ok, I fucking hate QoS.  I've taken a class on it, studied it, read the book...shit just drips out of my brain the second I'm not staring at it.  It's like the ghost from mario; When you aren't looking it's trying to kill me.

* Congestion avoidance (WRED or WTD)
* Congestion management (queuing)

Now, Cisco recommends classification and markings be done "As close to the source as possible."  Well, let me throw an ACL and match by IP address and mark these packets with the appropriate DSCP markings so that I can ensure my link isn't crushed by Candy Crush ©®℗™℠.  But what about those links up to the L3 device?  Those stupid ass L2 switches have their own queues and thresholds and other shit.  If we only implement MQC..then we aren't deploying QoS "End-to-end."  Shut up Cisco.

Now, I won't pretend to be an expert on this crap...even though I am technically certified as one.  I hate QoS, did I mention that?  Anyways, lets talk this thing out, friends.

Some basic points:

CoS (Class of Service) is L2

DSCP (Differentiated Service Code Point) is L3

There is a whole lotta stuff to talk about regarding these two points; how to convert the numbers from binary, what fields make up these numbers, etc.  We can talk about those if we want...but a lot of those points are googlaable.  One major point is that these values are by default not trusted..but we'll get back to that.

Now what makes up QoS:

* Classification
  * What is it, and what it do.
  * Do it as close to the edge as possible.
* Marking
  * "Coloring" packets with a certain color to be identified as it flows through the network.
  * Do it as close to the edge as possible.

We can classify and mark at L2 or L3..L2 would be using the CoS and L3 would be using DSCP.  CoS markings are obviously lost if it goes over a L3 link...we can mitigate this by mapping the L2 CoS value to a L3 DSCP value.  Once the traffic has been successfully marked, it can be accessible for QoS handling on the network!

Now that we know those basics..we have to actually find out the traffic on the network.  You can use NBAR, Netflow, Cisco IP SLA, etc.  The point is to learn what is on the network.  I know of some people that swear by aproduct called [LiveAction](http://liveaction.com/), while others have used something called [Scrutinizer](https://www.plixer.com/Scrutinizer-Netflow-Sflow/scrutinizer.html).

Once you understand what is on the network, it is recommended to try and group this into differing QoS service classes.  These classes are simply a logical grouping of packets that are to receive similar levels of applied quality.  A service class can be as granular as that of a single user (MAC/IP address) or by application (Port number/URL).  There are a number of service class templates to help facilitate the mapping, be it a 4- and 5-class model, 8-class model, or 11-class model..it really depends on how granular you wish to get.  The most important note to make about these different service classes is that they are consistent.  If you have a Voice service class with a DSCP marking of 46...you better use 46 everywhere in your environment (or good luck unraveling that shitball).

Now that we've discovered what is on the network we need to classify it and mark it appropriately so that it is correctly handled.  Where and how we do this is up to the environment.

* You CAN mark L2 frames on a PC if the NIC supports it.
* You PROBABLY will mark at the Cisco phone for voice (if there is one) and reclassify or mark the incoming PC frames.
* You PROBABLY will accept the markings or remap at the access switch.
* You PROBABLY remap the CoS values to DSCP..or accept the L2 markings.

The above points are the QoS trust boundaries.  By default...Cisco does not typically trust any markings.  Why would they?  Joe Shmoe could mark his own traffic as AF46 (The best service, typically)...so we would rather control where that point is configured.

*****

Remember why I hate L2 QoS?  **The number of hardware queues available differ in each switch model, supervisor, and line card.**  Some switches suck and ONLY support egress queuing..**cough 2960S cough**..so you have to know the capabilities of the switch.  The queuing mechanism is represented as 1PxQyT.  What the fuck did I just say?  P=Priority queue, Q=Non-priority queues, T=Thresholds *per* queue.  Now looking at the 3750 we have...we see that it has differing queuing mechanisms for input and output.  For input, it has a **1P1Q3T ingress/Receive queue** and a **1P3Q3T Egress/Transmit queue.**

What is a priority queue?  Well, it depends (Screw you QoS!!); Some switches (6500) service the priority queue whenever there is traffic in it...which may starve other queues.  Some switches support one or more drop thresholds to a queue (like our 3750 example).

What happens in these queues is FURTHER made difficult...ugh!  Our faithful 3750 uses SRR for both ingress/egress queues.  INGRESS IS ALWAYS SHARED WHILE EGRESS CAN BE EITHERendrant.  The 6500 uses WRR AND SRR...depending on the supervisor and line card.

Once we know the capabilities of the particular switch..we can start prioritizing traffic by placing packets with particular DSCP or CoS values into certain queues and threshold values.  When supported, the threshold values can be used to set the point where the switch congestion avoidance mechanisms will start to drop that traffic.

Now that we know the 3750 has a total of 2 ingress queues (1 priority and 1 non-priority) and 3 thresholds per queue...we can start carving it out!

WTF is a threshold?  It ultimately all comes down to port with a finite buffer space, broken out into independent queues, or figurative lines the incoming frames must wait in.  We have to identify the cutoff point on those individual lines in which to start tail dropping traffic.

What percentage/ratio is assigned to each independent queue is determined by the mls qos srr-queue input buffers <queue#1> <queue2> global command.  Using mls qos srr-queue input buffers 90 10 as an example, queue 1 has 90% of the available buffer space, while queue 2 has 10%.  Queue 2 is the priority queue by default!  Furthermore, we can identify the bandwidth amount per queue!  We do this by using the global command: mls qos srr-queue input bandwidth <queue1> <queue2>.  Furthermore, we can specify the priority queue bandwidth amount with the global command mls qos srr-queue input priority-queue <#> bandwidth <%>.  An example configuration of this could be "mls qos srr-queue input bandwidth 70 30" and "mls qos srr-queue input priority-queue 2 bandwidth 30."


If the potential maximum is 100% of a threshold until traffic starts dropping for the independent queues, thresholds can be identified with specific CoS/DSCP mappings.  To  expand on this, you can map certain values to a queue with different thresholds.  For example, the global command
mls qos srr-queue input cos-map queue 1 threshold 1 0 1 2 would map the cos of 0, 1, and 2 to queue 1 threshold 1 and mls qos srr-queue input cos-map queue 2 threshold 1  4 5 would map the cos of 4 and 5 to queue 2 threshold 1.  ALL THIS IS DOING IS ASSIGNING THE COS VALUES TO THE RESPECTIVE QUEUES AND IDENTIFYING THE QUEUE THRESHOLD!

ANOTHER Important note:
You can configure SRR on egress queues for sharing or shaping.  However, for ingress queues, sharing is the default mode, and it is the only mode supported.  Shaped mode guarantees bandwidth and rate limnits to that amount.  Inversely, shared mode guarantees bandwidth but can utilize unused bandwidth assigned to other queues.  Ultimately, shared round robin is a minimum bandwidth guarantee.

EXAMPLE TIME!!!

Now using the following cos-maps...
mls qos srr-queue input cos-map queue 1 threshold 1  0 1 2
mls qos srr-queue input cos-map queue 1 threshold 2  3
mls qos srr-queue input cos-map queue 1 threshold 3  6 7
mls qos srr-queue input cos-map queue 2 threshold 1  4 5

Since this is an INGRESS queue, we are using SHARED mode SRR.  To reiterate, that means that all of the queues (all 2 of the ingress queues) can utilize the available bandwidth presented to them.

Using the line analogy, we've essentially created 2 lines (queues) with different lengths (thresholds) in which they can grow before management starts kicking people out.

Now what about the egress queue?

The concepts are IDENTICAL, with the exception being that egress queues use shaped mode over shared mode, which guarantees bandwidth and rate limits to that amount.  Being that it is shaped mode, we can configure threshold limits!  Furthermore, each port supports four egress queues, one of which (queue 1) can be the egress expedite queue. These queues are assigned to a queue-set. All traffic exiting the switch flows through one of these four queues and is subjected to a threshold based on the QoS label assigned to the packet.

The switch uses a buffer allocation scheme to reserve a minimum amount of buffers for each egress queue, to prevent any queue or port from consuming all the buffers and depriving other queues, and to control whether to grant buffer space to a requesting queue. The switch detects whether the target queue has not consumed more buffers than its reserved amount (under-limit), whether it has consumed all of its maximum buffers (over limit), and whether the common pool is empty (no free buffers) or not empty (free buffers). If the queue is not over-limit, the switch can allocate buffer space from the reserved pool or from the common pool (if it is not empty). If there are no free buffers in the common pool or if the queue is over-limit, the switch drops the frame.

Lets pretend we have the following configuration...
mls qos srr-queue output cos-map queue 2 threshold 1 2
mls qos queue-set output 1 buffers 15 30 35 20
mls qos queue-set output 1 threshold 2 40 70 90 400

What are we doing?

Well, lets break each one out (remember, this is going to be very similar to the input queue).

mls qos srr-queue output cos-map queue 2 threshold 1 2
Here, we're simply mapping the cos value of 2 to queue 2, threshold 1 (3 per queue).

mls qos queue-set output 1 buffers 15 30 35 20
Each threshold value is a percentage of the queue’s allocated memory, which you specify by using the mls qos queue-set output qset-id buffers allocation1 ... allocation4 global configuration command. The sum of all the allocated buffers represents the reserved pool, and the remaining buffers are part of the common pool.  In this example, 15% for queue 1, 30% for queue 2, 35% for queue 3, and 20% for queue 4 (15+30+35+20=100).

mls qos queue-set output 1 threshold 2 40 70 90 400
This is where the egress queue gets squirrely.  What do these values mean?  We're saying that the threshold values for queue 2 are as follows: 40% for threshold1, 70% for threshold2, 100% for threshold3 (non-configurable), 90% for reserved, and 400% maximum.

Well, that was confusing as shit.

Another example to help drive it home with a look at queue 2:

mls qos srr-queue output cos-map queue 2 threshold 2  4
mls qos srr-queue output cos-map queue 2 threshold 3  6 7
mls qos queue-set output <1/2> threshold 2 40 70 90 400

When the buffer is filled with 70% of traffic it will start dropping traffic with cos 4 and not traffic with cos 6 or 7 because it's mapped to thresshold 3 (=100%)

But what about the reserved and max?

[buffer size:
mls qos queue-set output 1 buffers 15 30 35 20
mls qos queue-set output <1/2> threshold 2 40 70 90 400

If you take for example queue 2, we configured 90% as reserved. So you reserve 90% of the buffer size of queue 2 (which was 30% of the total buffer space).  So out of a theoretical 100%, we gave 30 of that to queue 2.  Of that 30 %, we configured 90% as reserved.

The remaining 10% from queue 2 is seen as common buffer space. Can be used by queue 1, 3, 4

Max reserved means, how much it may expanded and use buffer space from the common pool buffer space as explained above.  Of that 10% that is not reserved...it can be used to service the other queues.

Helpful show commands:
show mls qos: This will show you if QoS is enabled!
show mls qos queue-set: This will show you the queue-sets configured for the output queues.
show mls qos input-queue: This will show the configured buffer, bandwidth, priority%, and threshold values for the different queues.

Also, what is the queue-set number meaning?  1 is default...AKA you don't have to configure anything.  You CAN configure a queue-set 2, but it will require interface-level configs (queue-set 2) to use.  Having more than 1 could simply allow for more granularity.

Interface level configs:
interface giX/X/X
priority-queue out - Enables the priority queue; The expedite queue is a priority queue, and it is serviced until empty before the other queues are serviced.
mls qos trust device cisco-phone - Extends the trust zone to the phone.
mls qos trust dscp - Trusts the DSCP value; By default the DSCP value is not trusted.
srr-queue bandwidth share 1 30 35 5 - Here we are saying 1. Ignore queue 1's SRR sharing weight as this is the priority queue.  Furthermore, were allocating 30% to queue 2, 35% to queue 3, and 5% to queue 4.  Because we said share, the other queues can use bandwidth from other queues if under congestion.


Policing:  The point I want to notate is the amount + the burst.  Kevin Wallace explained this better than anyone I've ever heard: The specified rate is an AVERAGE.  Think of it as intercity traffic; you go as fast as you can, until you cant.  The rate is TECHNICALLY the speed limit, but you go as fast as the traffic allows.  While the speed is the line rate, the amount that goes is the burst rate (why it is in bytes not kbps, mbps, etc).

  • Optimally deployed as ingress tools as they make instantaneous send/drop decisions.
  • Do NOT delay traffic, they simply check the traffic and make a decision.
  • When supported, markdowns should be done according to standards-based rules (AFX1 to AFX2 for example).
Shaping: Uses buffers to smooth out spiking traffic flows for later re-transmission.
  • Only applied as egress tools.
  • Objective is to NOT drop the traffic.
  • Excess traffic is buffered and delayed until the offered traffic dips below the defined rate.
  • Real-time traffic should be shamed to 10ms intervals.  Since tc cannot be manipulated directly, use the formula Tc=Bc/CIR.  For example, if we have a 1Gbps link that we wish to shape to 120Mbps with 10ms intervals..how much data should go per interval?  If we wish to have 10ms intervals, then there will be 100 intervals per second (1000/10ms).  That would mean that we'd need to have a Bc value of 1.2 Mbps.  So for every interval, 1.2 Mbps will be sent at a time interval of 10ms.  


ASIC+Buffer:  The buffer amount is shared per ASIC.  The number of ports per ASIC is dependent on the hardware version of the switch.  The 2960S, for example, has 2 ASICs..or 24 ports per ASIC.  This can be identified by performing a show platform pm if-numbers; The first number in the port column identifies the asic/X.  For example, 0/X would represent a port that is in ASIC 0 and 1/X would represent a port that is in ASIC 1.  In an ideal world, we'd split traffic across the ASICs by connecting some hosts on the first set of 24 ports and some on the other set of 24 ports, to best utilize the buffer memory.

Buffer vs Bandwidth?  The biggest thing to know is that if its a 100Mb connection or a 10Gb connection...the transfer rate is still the same: How fast electricity is sent over copper.  That being said, what makes a 1Gb or 10Gb connection different?  The difference is the rate in which the scheduler can service the queues.  When we allocate bandwidth, we're essentially allocating a weighted value to how often the scheduler will service the queues.  When we reference the buffer, we're telling the hardware how much memory to allocate to the queues.

Buffer notes:
  • Give every queue at least 10 % buffer space with a thresholds of 40 %.
  • Setting thresholds too high may result in one highly congested port stealing buffer memory from all the other ports.
  • If every queue reserves the maximum possible very little will be left in the common buffer pool.
  • If a queue doesn’t reserve anything it may be starved by the other queues/ports.
Dropping: Tail drop or random drop
  • Tail drop is used by both policing and shaping; when the traffic exceeds a certain rate, every packet is dropped until traffic drops below that rate.  This has adverse effects on TCP re-transmission.
  • Random drop is a tool that randomly (go figure) drops packets in an effort to drop packets to AVOID congestion that may lead to tail dropping.  This works more closely with TCP retransmission logic.
  • Best used to regulate TCP-based data traffic...sucks for real-time traffic.


Input:

Cisco 3750
  • Queuing:
    • 1 Priority queue, 1 non-priority queue, and 3 thresholds per queue (1P1Q3T)
    • Queue 2 is the priority queue by default.
  • Buffer:
    • We specify the input buffer ratio with the following command: mls qos srr-queue input buffers <queue1> <queue2>.
  • Bandwidth: 
    • SHARED round robin.  This is applied globally.  Shared means that its a MINIMUM bandwidth guarantee.  Should other queues need additional bandwidth and it is available, they can "share" the bandwidth.  Only in times of congestion does the bandwidth guarantee take place.  
    • We can specify the bandwidth amount for both queues: mls qos srr-queue input bandwidth <queue1> <queue2>.
    • We can specify the bandwidth specifically to the priority queue: mls qos srr-queue input priority-queue <#> bandwidth <%>

Output:

Cisco 3750
  • Queuing:
    • 1 Priority queue, 3 non-priority queues, and 3 thresholds per queue (1P3Q3T)
    • Queue 1 is the priority queue by default.
  • Buffer: We specify the output buffer ratio with the following command: mls qos queue-set output 1 buffers <queue1> <queue2> <queue3> <queue4>. 
    • The egress buffer is shared PER ASIC.
  • Bandwidth: 
    • SHAPED or SHARED round robin.  This is applied at the interface level.  Unlike shared that is a minimum guarantee, shaped is a MAXIMUM bandwidth guarantee.  In other words, it gets a reserve portion of a port's bandwidth, and no more.
    • We can specify the bandwidth amount for all 4 queues...AT THE INTERFACE LEVEL!
      • srr-queue bandwidth share weight1 weight2 weight3 weight4.  This specifies the weighted values for shared mode.  These weights do NOT have to equal 100%  They are weighted values.  For example, if we had the weights 100 100 100 100, we'd have a total of 400.  We'd essentially be giving each queue a weighted value of 100/400, or 25%.  
      • srr-queue bandwidth shape weight1 weight2 weight3 weight4.  This specifies the inverse of the weight (1/weight) to determine the bandwidth for a queue.  For example, the weight values 50 50 0 0 applied to a 1Gbps interface would mean 1/50th of the bandwidth of the 1Gbps link..or ~20Mbps.  A value of 0 means...do not shape..or in other words..NO LIMIT--WOOHOOO!!!!
      • If an interface has BOTH shaping and sharing...the shaped mode configuration is applied.
      • srr-queue bandwidth limit weight can be used to specify the max amount of an interfaces bandwidth that can be used for outgoing traffic.  By default, there is no limit (i.e. a weight of 100).   AT THE INTERFACE LEVEL.

Scenarios:

1. We want to limit inbound traffic to 50 Mbps on a 1Gbps link.  We could/should use a policer.  We cannot used shaped round robin, as this is only available on egress interfaces.
2. We want to limit outbound traffic for a particular queue to 40 Mbps.  We could use shaped round robin.

Practical implementation:

  • Classify traffic as close to the trust boundary as possible.
    • Use class-maps to match the traffic types (Can use L3 addressing, L2/L3 markings, ports, or specific protocols).
    • Default class-map treatment is match-all.
    • NBAR (match protocol) is more CPU intensive than by matching traffic by DSCP, addresses, or ACLs.
  • Marking of traffic entails writing a value in the frame or packet header to document the class of traffic the packet has been determined to belong to.
    • If the packet markings are not trusted, they are re-marked to a DSCP value of 0.
      • By default trusting COS causes the DSCP value to be rewritten to the corresponding value based on the cos-dscp map.
    • Marking is often done at the end device for Cisco voice and video products.
    • Class-based marking occurs after classification.  Therefore, if used on an output policy the packet markings can be used by the next hop-node to classify the packets but cannot be used on this node for classification purposes.  If class-based markings are used on an ingress interface as an input policy, the markings applied to the packet can be used on the same device on its egress interface for classification purposes.
    • If you apply an output policy to tunnel interface, the marking is applied to the inner packet header.
    • If you apply an output policy to the physical interface, the marking is applied to the output packet header.
    • Mark voice traffic EF (DSCP 46).
    • Broadcast video should be marked to CS5 (DSCP 40).
    • Real-time interactive traffic should be marked to CS4 (DCSP32).
    • Multimedia conferencing should be marked to the AF4 class (AF41, 42, or 43..or DSCP 34, 36, or 38, respectively). 
    • Multimedia streaming should be marked to the AF3 class (AF31, 32, 33 or DSCP 26, 28, 30, respectively).
    • Transactional data (excessive latency in response times directly impacts user productivity--low-latency) should be marked to the AF2 class (AF21, 22, 23 or DSCP 18, 20, 22, respectively). 
    • Bulk Data (High throughput data service--non-interactive background data applications) should be marked AF1 class (AF11, 12, 13 or DSCP 10, 12, 14, respectively).  
    • Best Effort should be marked DF (DSCP 0)
    • Scavenger Should be marked to CS1 (DSCP 8).  
    • Network control should be marked to CS6 (DSCP 48).
    • Signaling should be marked to CS3 (DSCP 24). 
    • Use set dscp and set precedence, as using set ip dscp only matches IPv4 and not IPv6. 
  • Voice should be admission controlled.
    • Examples: G.711 and G.729a VoIP calls
  • Broadcast video should be admission controlled.
    • Example: Cisco IP Video Surveillance (IPVS), Cisco Digital Media Players (DMPs).
  • Real-time interactive should be admission controlled.
    • Example: Cisco TelePresence. 
  • Multimedia conferencing should be admission controlled.
    • Example: Cisco Unified Personal Communicator, Cisco Unified Video Advantage, etc.
  • Multimedia streaming MAY be admission controlled.
    • Example: Cisco Digital Media System VoD streams.
  • Transactional data should be treated with an AF PHB, with a guaranteed-bandwidth queue and DSCP-based WRED.
    • Examples: Database applications, data components of multimedia collaboration applications.
  • Bulk data should be treated with an AF PHB, provisioned with a guaranteed-bandwidth queue and DSCP-based WRED.
    • Usually provisioned in a moderately provisioned queue to provide a degree of bandwidth constraints during periods of congestion.
    • Examples: FTP, email, backup operations, etc.
  • Best effort should be provisioned with a dedicated queue and may be provisioned with a guaranteed-bandwidth allocation and WRED/RED.
  • Scavenger class should be assigned to a minimally provisioned queue.  
    • Examples: iTunes, YouTube, BitTorrent, etc.
  • Network control traffic may be assigned a moderately provisioned guaranteed-bandwidth queue.  
    • Examples: EIGRP, OSPF, BGP, HSRP, IKE, etc.
  • Signaling may be assigned to a moderately provisioned guaranteed-bandwidth queue.
    • Examples: SCCP, SIP, H.323, etc.
CBWFQ notes:
  • Use fair-queue presorter within a policy-map to manage fairly multiple flows contending for a single queue.  Without using the fair-queue policy-map configuration, the default is FIFO.  What does this mean?  By "fair queuing," we create "mini" queues within the queue, per session.  As seen on the right, the top picture indicates fair-queuing while the bottom one indicates FIFO.  With fair-queue, the router will give each "mini queue" equal shares of the allocated bandwidth.  Ultimately, the goal is to ensure that low volume talkers are not starved out of bandwidth by higher volume talkers.
  • 64 configurable queues.
  • Each queue is serviced in a weighted round robin (WRR) fashion based on the bandwidth assigned to each class.  The CBWFQ scheduler then forwards packets to the Tx-Ring.
  • Do NOT exceed 33% of the link capacity for the priority queue--you may starve other classes.  IF there are links dedicated to a particular traffic type...ignore this rule.
  • LLQ includes an implicit policer; a MAXIMUM bandwidth allocation.
  • Allocate at LEAST 25% of link bandwidth for the default class; Unclassified applications end up here.

Congestion avoidance:  Work BEST with TCP-based applications because selective dropping of packets causes the TCP windowing mechanism to throttle back and adjust the rate of the flows to manageable rates.
  • Little impact on UDP..as no retry logic.
  • Random early detection (RED): Randomly dropping of packets before it is all done at once (tail dropping) stops global synchronization of TCP streams.
  • Weighted random early detection (WRED--WHAT CISCO USES): Uses AF drop preference values to drop packets more aggressively if it has a higher AF drop precedence.  This is configured by using random-detect dscp-based.  Do not configure WRED on the LLQ, but should generally be used whenever the feature is available.  If you configure WRED on a policy map, make sure that it is not configured at the interface level.


Friday, March 13, 2015

Fun MTU issue

So the scenario is this:

Our DMVPN hubs are Cisco 881 routers connecting to a Cisco ASR 1006.  We run the standard MTU setting on our DMVPN tunnels: Setting the MTU to 1400 with a maximum TCP segment size of 1360.

Everything is working fine and dandy until the night of an F5 upgrade.  Post-migration all users are working.....except one user--who happens to be one of our F5 admins!  He calls me up to verify our DMVPN connectivity, as his connection going down would seem to point to all of DMVPN going down.

Weird..my DMVPN connection is just fine..and so is the other 90+ spoke connections!  The first thing we see after I get him access to the device is that it appears to be failing phase 1 negotiation--"MM_NO_STATE" cycling between "MM_KEY_EXCHANGE."

Hm...did his device lose his certificate somehow (we don't use pre-shared keys)?  Nope--cert is there and appears to be active.  We try to renew the certificate and delete the old one--no dice!  After exhausting all troubleshooting efforts I feel comfortable doing--since I'm walking him through the CLI over the phone--we call it a night.

The next day we get a packet capture and see the following (Sorry for blotting out the head-in IP):


Hm....that doesn't look good.

Here is a look at the first fragment:
As you can see, the total length is 1492 bytes (if you include the 20 byte IP header).


This fragment is even smaller!
If you exclude the header...its only 8 bytes!


Based on the above line in the packet capture, this tells me that the head-in did not receive all the fragments in the allocated time slot..so it sent back an ICMP message to the source saying "HAY!  I didn't get all the fragments---try again!"  Based on the packet capture..this seems to be true, as the process continuously restarts and the process continues indefinitely.

Lets compare this capture against one that is working (my 881 for example!):
Based on the output..there appears to still be fragmentation.  Bummer.  Lets take a look at these fragments!
Similar to the first fragment with the problem 881...no big deal.


Interesting....this 2/3 fragmented packet is much larger than the 8 byte fragment we received from the problem child.


Why is this stuff being fragmented at all?  If we modify the physical interface on the 881 ( on my 881), all we see is that the total length of the initial fragments go down..but they never go away.  Most traffic on the internet is either TCP or small-packet UDP....but within IKE protocol, we have the rare distinction of large UDP packets.  These packets just so happen to be the #5 and #6 packets in IKEv1 main mode...or the IKE_AUTH packets in IKEv2..especially when using certificate authentication.

Ok, I can sleep at night knowing this is a known thing when running IKE and certificates (vs preshared keys).  But why this user in particular?  Remember that weird 8 byte fragment?  This user happens to be running good ole' DSL!  With DSL, it uses a PPPoE connection (IP over PPP).  There are 2 bytes from IP over PPP and 6 byes from PPPoE framing added to every packet.  Is it possible that his DSL connection is adding just enough overhead...to cause even further fragmentation?

Last night I called him and asked him to try something for me: Modify the physical interface to have an ip mtu value of 1400--versus the default 1500.

"SWEET JESUS THE CONNECTION IS BACK!" Almost immediately after modifying the MTU to 1400...the VPN connection was successfully built.


Another stupid MTU finding!

In this scenario we have a customer running OTV.  The L3 link between the devices is through an MPLS provider.  We have connectivity across the link, but none of the web GUIs are working (storage array, HP blade chassis management, etc).  

My immediate though is MTU.  OTV adds an additional 42 bytes of overhead..so just like with PPPoE, IPsec, or any other encapsulating protocol...MTU must be taken into consideration.

The problem we have is that the MPLS provider is using the default MTU: 1500.  When the packets are set from the OTV router to the MPLS provider using the default MTU of 1500, the receiving router gets the packet and says "NOPE, too big, fragmenting!"  

The problem is OTV doesn't allow fragmentation by default!  SO what can we do?  We can increase the MTU of the entire path (jumbo MTU possibly) so that when the upstream links receive the datagrams they don't fragment?  The problem of this is that it isn't really feasible..thats a lot of links and a lot of headache.  

Alternatively, we can apply the following statement on the ASR: "otv fragmentation join-interface <join-interface>."  The join-interface is the one peering with the upstream router; the interface with multicast configured (not the one with the bridge IDs).  

Immediately after we applied the fragmentation command globally, (essentially telling OTV, "HEY dude, allow fragementation!") HTTP/HTTPS traffic started working.

Is fragmentation good?  Well, not ideally..but we have to work around it in some scenerios.

Saturday, January 24, 2015

CCIE R&S #46535!

This process started in June 2014.  I had a co-worker at the time who was to me as an astronaut is to a small child; he motivated me to go onto bigger things.  It didn't take long for me to convince work that footing the bill would be a worthwhile investment, as my work ethic has (hopefully) has become evident in my day to day work.  

I convinced work that the INE all access pass would be a great first start.  "It has access to training videos across every track, has rack rentals, workbooks, and has a proven track record," I told them.  While I knew this approval process would take a couple of weeks, I started looking into other materials to use.  I quickly found many positive reviews on the "Your CCIE Lab Success Strategy: The Non-Technical Guidebook."  I felt as this would be what I needed to fully understand what I might be getting myself into.  I found this book to be AMAZING!  It gave an truthful, unfiltered explanation of what mindset one must have to truly be successful.  As many have said, "You don't have to be a genius..or even smart to pass the CCIE.  You MUST be committed."  I found the most helpful insight to be with how to approach the topic with your family.  I wasn't sure how to best express what the next year might hold for us.  Within my study group (I'll get back to this), we consider this book to be our sacred book.  The agreement that my wife and I came to was that she would take over all household duties, allowing me to study uninterrupted for the next year.  

After the INE purchase was successful, my approach for the next year was nothing fancy: Watch the videos, do the related labs, make notes, and repeat.  Now that I had a process...one has multiple questions he or she must answer.  How will I build my CCIE lab?  How will I organize my notes?  Rack rentals were my initial go-to for the labs...but I found them to be frustrating.  It required me to have the foresight to schedule lab access in advance..and wasn't all that easy to load the pre-configurations (in my personal opinion).  After a bit of research, it seemed as if IOU and/or CSRs would be the two best methods.  I LOVE the CSRs and physical switches for doing INEs labs.  IOU has some...quirks when it comes to switching.  After doing all of the INE advanced technology labs, full scale labs, and Tshoot labs, I started to use IOU more so that I could have access to other vendor work books without having to pay for their rack rentals.  At this point....I wasn't in the mood to build out a new topology.  

Now that I had my lab and an approach, time to get cracking!  I pretty much followed the steps of L2, L3, VPN, MPLS, IPv6, Security, and Network services/management.  After watching a video, I started to make notecards.  A couple notecards turned into hundreds of notecards.  I'm not sitting on about 800 notecards, organized in order of Easy (random IGP timers) to Difficult (Scenario questions).  If I didn't have access to be lab..like at work..or...driving lol..I'd flip through a couple note cards just to stay sharp.  After work, a typical night would consist of 3 to 4 hours of study.  With 3-4 hours of study only consisting of 3-4 videos, It definitely isn't a quick process.  After finishing all of the videos from a section, then I would typically move on to the labs.  Should I run into an issue with the labs, i'd re-watch the videos before moving on.

After about...3 months into my studies I found someone on IEOC asking if others wanted to form a study group.  Best decision of the entire process!  I found that while co-workers are willing to help, it doesn't make much sense to bug someone with some random multicast question....if he or she has no incentive to help you.  Having like-minded individuals in the same boat worked perfectly!  "Hey guys....I'm doing this lab and it isn't doing what I think it should..."  Huzzah!  Webex session stood up and we all figure it out together.  Lastly, while my dear wife is more than understanding..she hardly wants to hear about my wonderful day of OSPF training...where as the study group does!  

Rinse and repeat for 6 months...FINALLY DONE WITH THE ADVANCED TECHNOLOGY VIDEOS/LABS!!!!  

I once read someone say that they knew that they were nearing the end of their studies when the idea of configuring <random IGP> one more time would make them throw up.  After going through the advanced technology labs for a second time....I was definitely ready to throw myself off a building.  My approach for re-visiting the advanced technology labs was a random one.  I used a spreadsheet that a guy in my study group created: Here you go! This allowed me to do random labs...without subconsciously having a bias.  

Once INE released there full scales and Tshoot labs...I kissed the advanced technology labs goodbye!  After I did each of these labs 3-4 times each...I started to look to INE for when more labs might be released.  Unfortunately (considering how great they'd been so far), INE wasn't quick to announce any new labs.  At the guidance from some other people, I started looking to doing a bootcamp.  One has the option of going through the various big names: INE, IPExpert, Micronics (Narbik), etc.  After reading positive reviews one after another....I decided that Narbik would be the best.  I figured if INE won't give me more labs..I'll find them elsewhere.

The bootcamp was $4500 (Thank you Dish!), 2 weeks long, and in Glendale CA.  The first week consisted of 2 full scale labs, various "hands on" labs (These rock), and a mountain of lecture.  I'm only repeating what many others before me have said: "Narbik is possibly one of the best instructors of ANYTHING, I've ever had."  The second week was where I really feel I got monies worth.  Compared to the limited troubleshooting labs through INE...Narbik fed me TS labs until I was ready to pop.  Being that the training center location was in Narbik's home (Armenia, CA) I ate more Armenian food in those 2 weeks than I had in my entire life!  I left Narbiks bootcamp more confident, more ready, and 15 pounds heavier than when I got there.  Good thing--my first attempt was the day after the bootcamp ended (12/19/2014).  


"I'M A FAILURE!!"  Thats right, I failed my first attempt.  I assumed I did ok..but apparently not:
SHIT.  WHAT?  I got 8/10 of the Tshoot tickets...diag was easy, and I felt as if I at least passed the Configuration section.  NOPE!  I found myself staring at the ceiling in my bed thinking "What could I have done wrong?  What could I have done differently?"  

Luckly, the study group was there to lift me up!  After talking to some of the members of the group, I realized the error in my ways.  I explained to them how paranoid I was in the troubleshooting section of breaking one of the rules (Don't remove any existing configuration).  I found that by forcing myself to not remove any existing configuration, I wasn't solving the fault (WHICH CISCO WANTS), and instead was working AROUND the faults.  Even though the 8/10 tickets had the desired output...I obviously (Heh..33%) approached it incorrectly.  

I settled with the fact that the configuration failure was my own.  I broke one of the CCIE cardinal rules: I obsessed about the grading process.  I found myself completing a configuration section, then thinking "Well..what if they grade it this way.."  As a result, I would pull out my configuration and start over--only to convince myself that I had it right the first time!  It wasn't until after 2/3 of the configuration section that I realized that I'd wasted too much time in the beginning.  Due to my waste of time...the last third of the exam was a typing frenzy.  I found that I had faults from misreading sections, only to go back and to realize that I'd missed entire tasks within the respective sections! 

My take away from my first attempt?  In the troubleshooting section I told myself that I have GOT to have a process for approaching the tickets.  I can't go in with a blaze of show commands expecting to be victorious.  Furthermore, formalize options for approaching a ticket and deploy the BEST option.  From the configuration section, simply taking the time to understand the tasks before trying to shotgun the configuration.  Time spent thinking before doing will ultimately be a time saver.

In that month before my second attempt I knew that I had to work on these take aways.  I also knew that I had to do something to speed up my configuration time.  If I wanted time for verification....simply going in sequential order would not do.  I found that I'd finish a section...and I couldn't even troubleshoot the damn thing until a task further down the list.  Knowing this....why not do them in the order that would allow me to verify sequentially?  I used what I remembered for the test to work on this.  Instead of doing IGP 1, IGP 2, IGP 3, BGP 1, BGP 2, BGP 3...I approached it as: I'm already in this device..why not configure BGP, MPLS, and whatever is required while I'm already here?  The only obstacle is that one must understand ALL of the tasks before doing this...as its easy to go "Shit, where was I?"  

After a night of only 5 hours of sleep (BETTER THAN LAST TIME!) I showed up to RTP.  David Blaire runs through the rules and tries to loosen up the candidates.  MAN this place is better than San Jose (In my opinion).  A couple of laughs and we all start our respective tests.  I annihilated the TS section this go around.  I was done after about 1.5 hours including verification--onto diag!  SWEET the exact same diag questions.  Onto the configuration sectoin---SWEET exact same questions as last time!  With my new found approach I FLEW through the configuration section.  By lunch...I completed most of the core topics (Notepad is your friend!!!).  After lunch, I finished the core topics, network security, and network management.  At this point it was nearly 2 and I finished the configuration section nearly 2 hours early.  After an hour of verification (nearly 2 run throughs) I figured it was time to call it quits.  I verified I had the desired output and that I hadn't broke any of the explicit rules.  Any more verification would require me to go line by line through my configs...which I decided I was not going to do.  I even through in a big TCL script or 2 to verify my reachability in my larger IGP sections.  

Back at the hotel I had a webex with my study group to discuss my feelings.  I told them that I felt fairly confident in my results..but I wasn't going to get my hopes up just quite yet!  I stayed up until 2 Am and with a final refresh I got my results--even before the email :)